
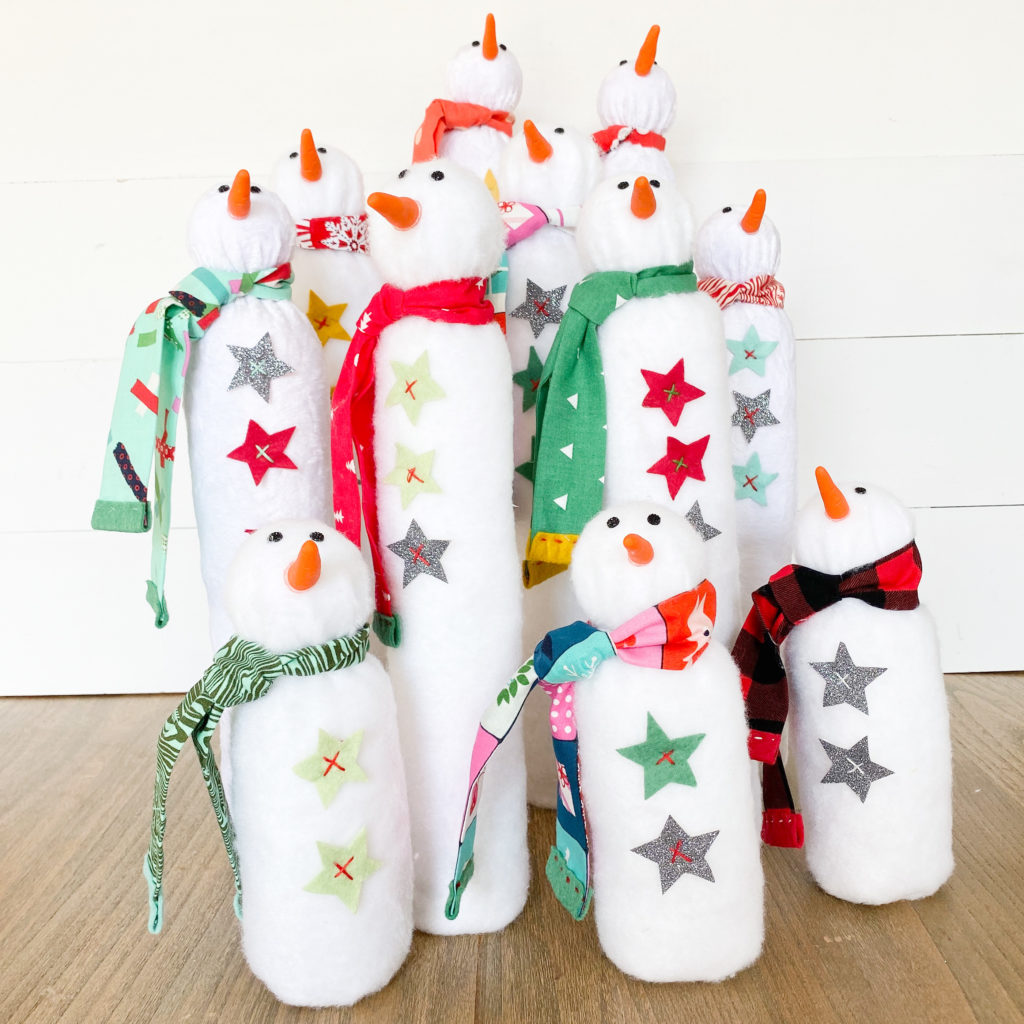
Today I am sharing with you the Tall Snowman Tutorial. Well, tall, skinny, short, fat, however you choose to make them. I will walk you through the process of making these fun and quirky snowmen for yourself. If you don’t have time or interest in making one I have a few in my shop during the holiday season every year.
Okay here we go…
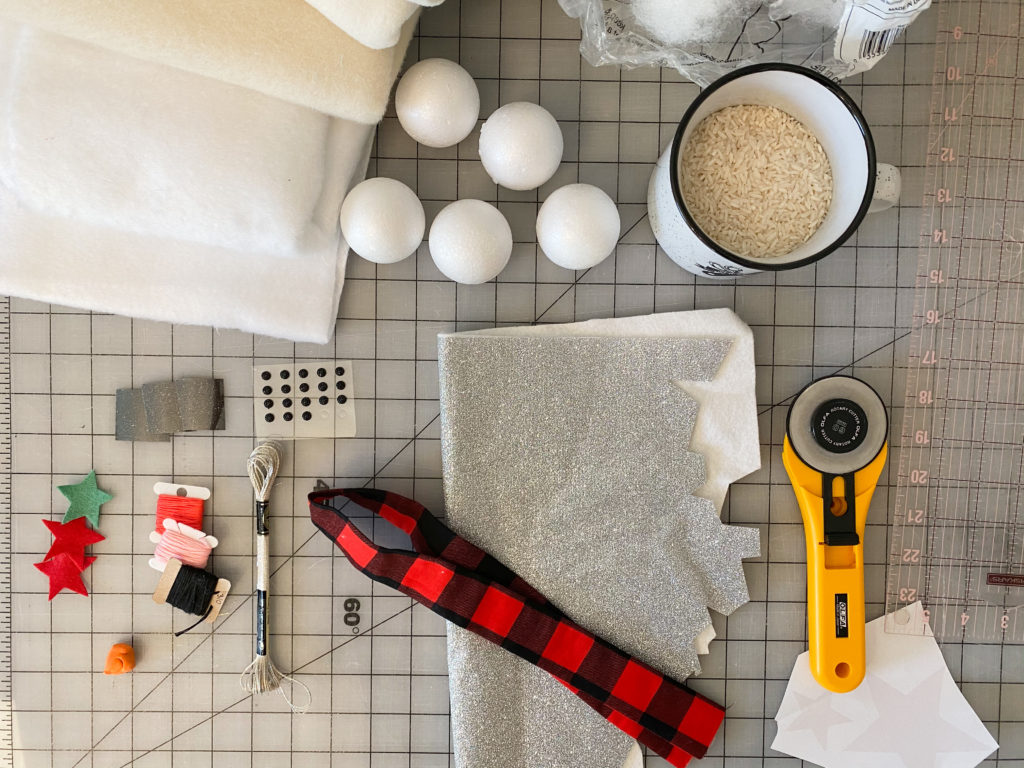
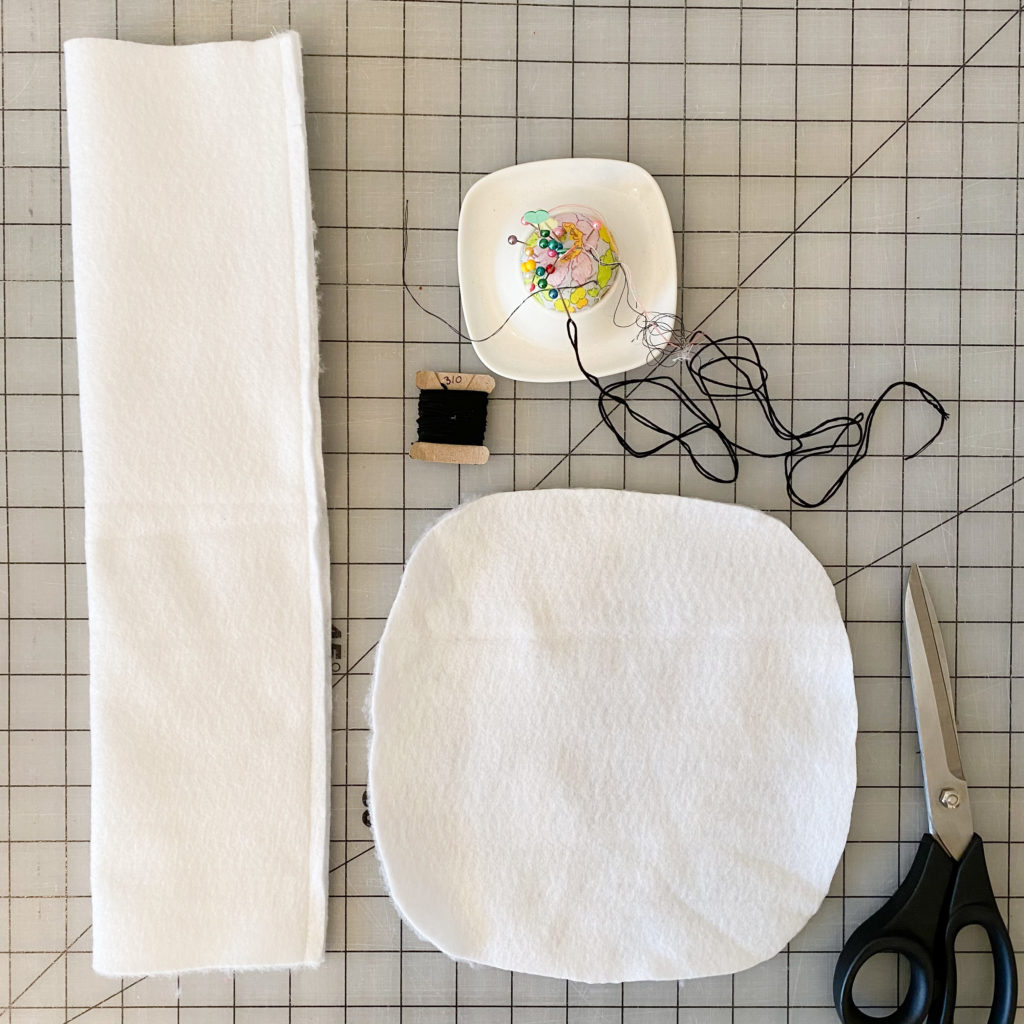
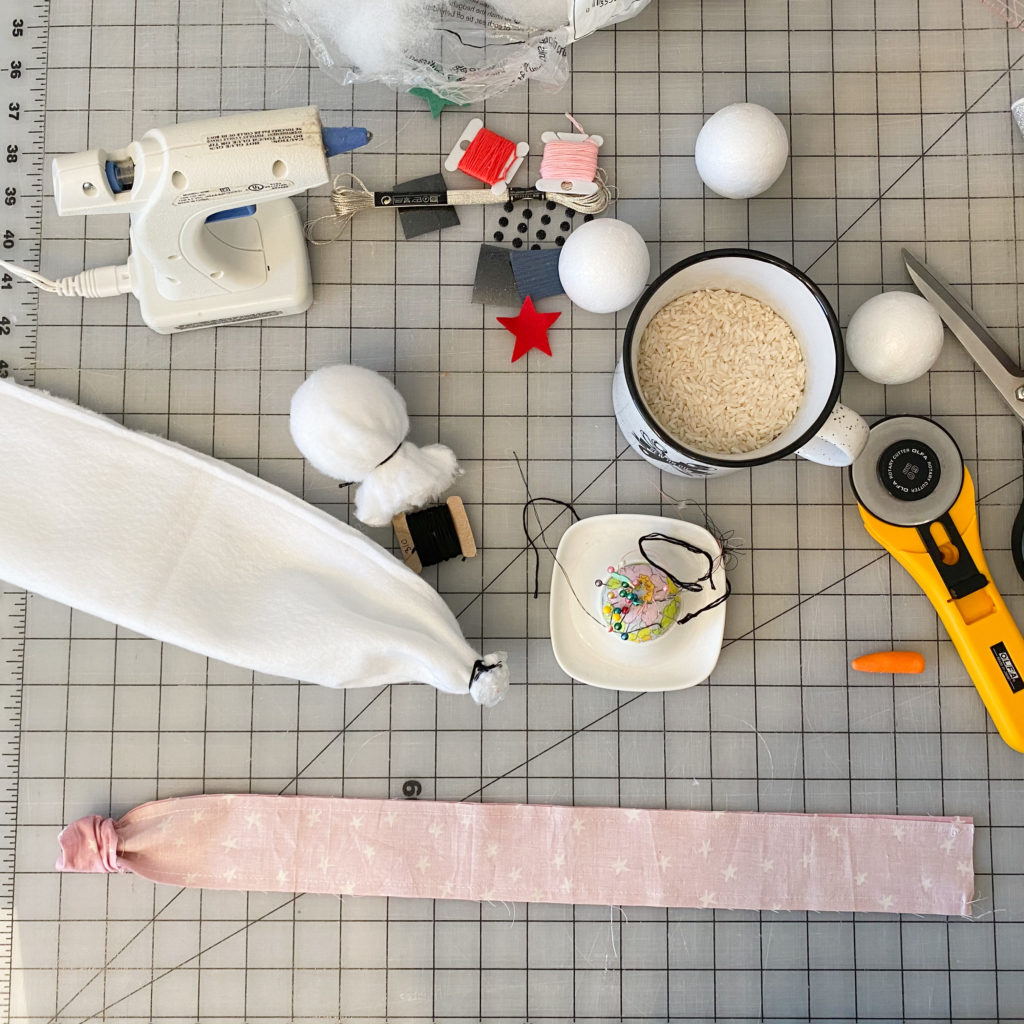
First you will need to collect your materials.
1/4yd – 1/2 of Fabric for Snowman Body: I have used felt, fleece, and some low pile plush faux fur. I suggest something thick and not stretchy. Fleece is borderline and works if it is nice and thick. Your snowman might just need a bit more rice and stuffing to keep him upright if the fabric isn’t thick enough to provide stability. I found a thick felt like fabric with a really low pile fuzzy feel to it at Joann fabrics. I unfortunately can’t find it on there site.
2″ Styrofoam Ball for Snowman Head: The hard styrofoam works best.
1-2 cups of Rice: to fill the base.
Small pieces of Felt: for stars maybe a scarf
Glitter Felt: what I used for some of my stars. I buy mine at Benzie Design. They sell pre-made glitter felt and also the glitter sheets to iron onto your own fabric. I have used both and they are both awesome and don’t shed glitter.
Long + Skinny piece of fabric for a scarf: roughly 2 pieces 2″ x 20″
You can cut a felt scarf, have a raw edge fabric scarf, knit a scarf, or use a few yarns or ribbon or yarn. The above materials are for a raw edge fabric scarf.
Eyes: What I used is a jeweled sticker. I have had to hot glue them. But anything about 1/8″ -1/4″ half rounded would work. I have use round black beads before but it’s best to then push them into the head so they don’t fully protrude. I have also used black paint and painted a black circle for eyes. You can also sewn on buttons. You may just want to sew a button on prior to tightening the fabric on the Styrofoam so it’s easier to get the needle through.
Orange Oven Hardening Clay: for the nose. Fimo or Sculpey brands are great.
DMC or Embroidery Floss: Coordinating colors for decorative stitches and sewing on stars. As well as white or cream to match the body fabric.
Next you need some tools and templates.
Download the Star template here.
A rotary cuter and ruler, but scissors work too.
A sewing machine is ideal. It can be stitched by hand if a sewing machine is not available.
A glue gun + glue sticks.
Scissors : needles : pins : thread to match your fabric
First make the nose. Mold the nose and then bake it according to the manufacturers instructions. With most molding clay it should take less than an hour to bake, some clay takes as little as 15 minutes.
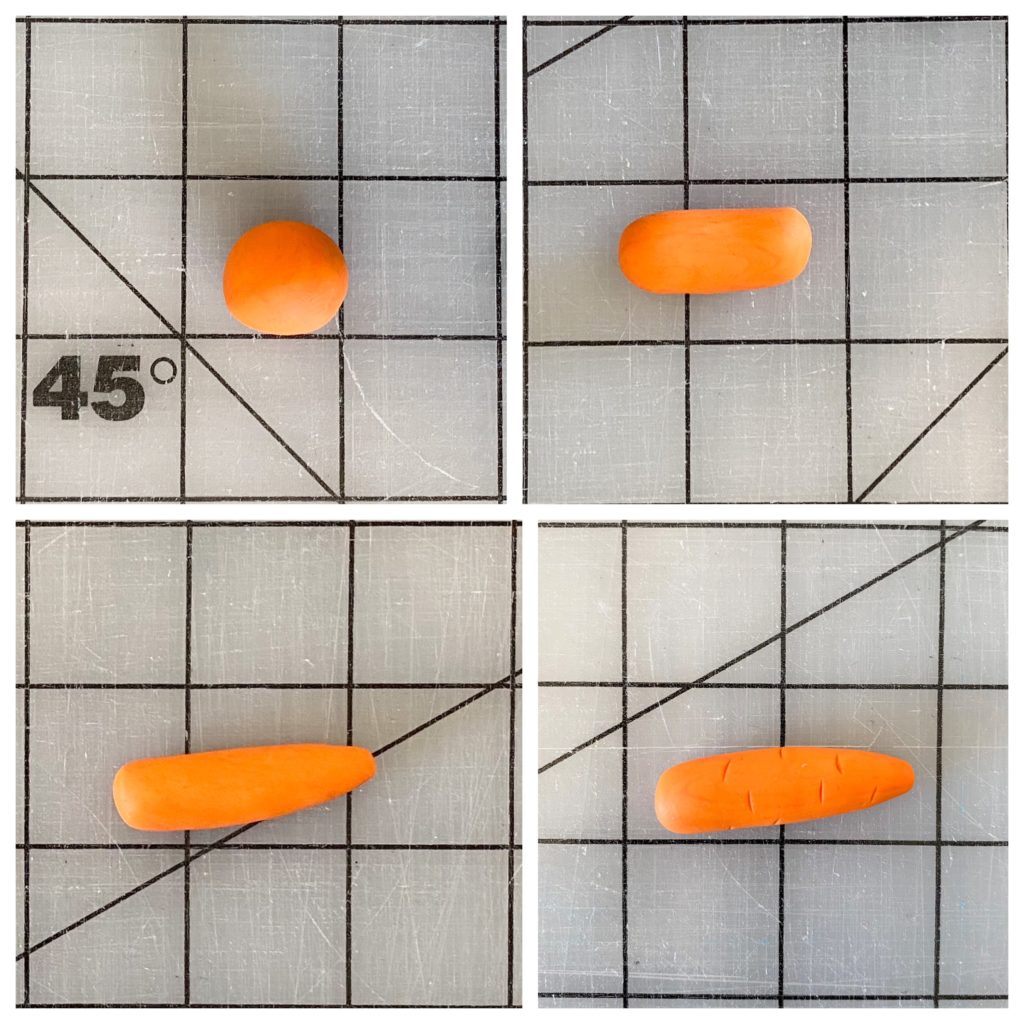
First make a ball that is roughly 5/8″-3/4″: (those grids are an inch square in the picture). Next roll the ball into more of a cylinder shape: Then roll one end of the cylinder till it is a smaller cone shape. Think carrots. Then using a knife or just your finger nail make tiny little dashes all around in a random pattern. Now bake per manufacturing instructions to harden. Make enough noses for all your snowmen and maybe a couple extra so you can get carried away if needed.
If you desire, before you bake, you can stick about half a tooth pick into the blunt end of the carrot, inserting a good 1/2″ so it sticks out 1/2″-1″. Then when you are attaching the nose to the snowman, stick the protruding toothpick into the foam head for extra stability.
I don’t typically do this toothpick trick, but I have had the occasional nose pop off in storage or when knocked over.

Now to cut the fabric snowman body and head shapes.
Cut a rectangle for the body.
For a roughly 15″ tall skinny snowman cut a rectangle roughly 8″ wide x 15″ tall.
For a roughly 9″ short snowman cut a rectangle roughly 8″ wide x 9″ tall.
You can play round with how tall or fat you want your snowman to be by changing the width and height of the snowman body. But I wouldn’t go much skinnier than 8″ wide as they can get to wobbly. I think the tallest I have done is 21″ and he is a touch wobbly. Also the fatter the snowman the smaller his head will appear so a larger size Styrofoam ball may look better.
The height of the rectangle you cut is roughly the height your snowman will be. You will lose some height from the base sewing and neck sewing, but will gain that height back in the head.

Cut a circle for covering the Styrofoam ball for the head.
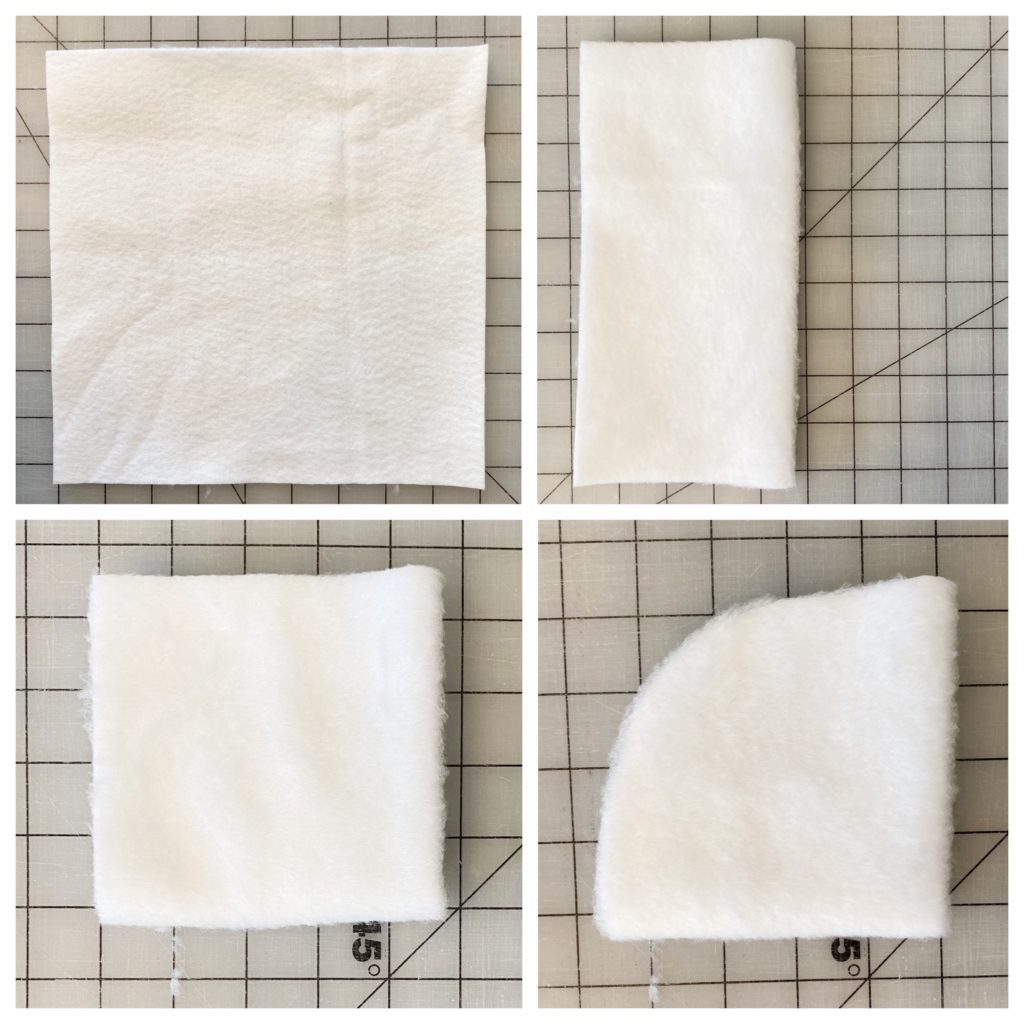
I started with a 9″ square but ended up using a 7″ square to not have a ton of excess fabric at the neck.
Cut a 9″ square, fold it in half, fold it in half again, and then cut a 1/4 circle. Once open it will be a rounded shape. Don’t worry it doesn’t have to be a perfect circle. OR use the circle template provided with the stars HERE.
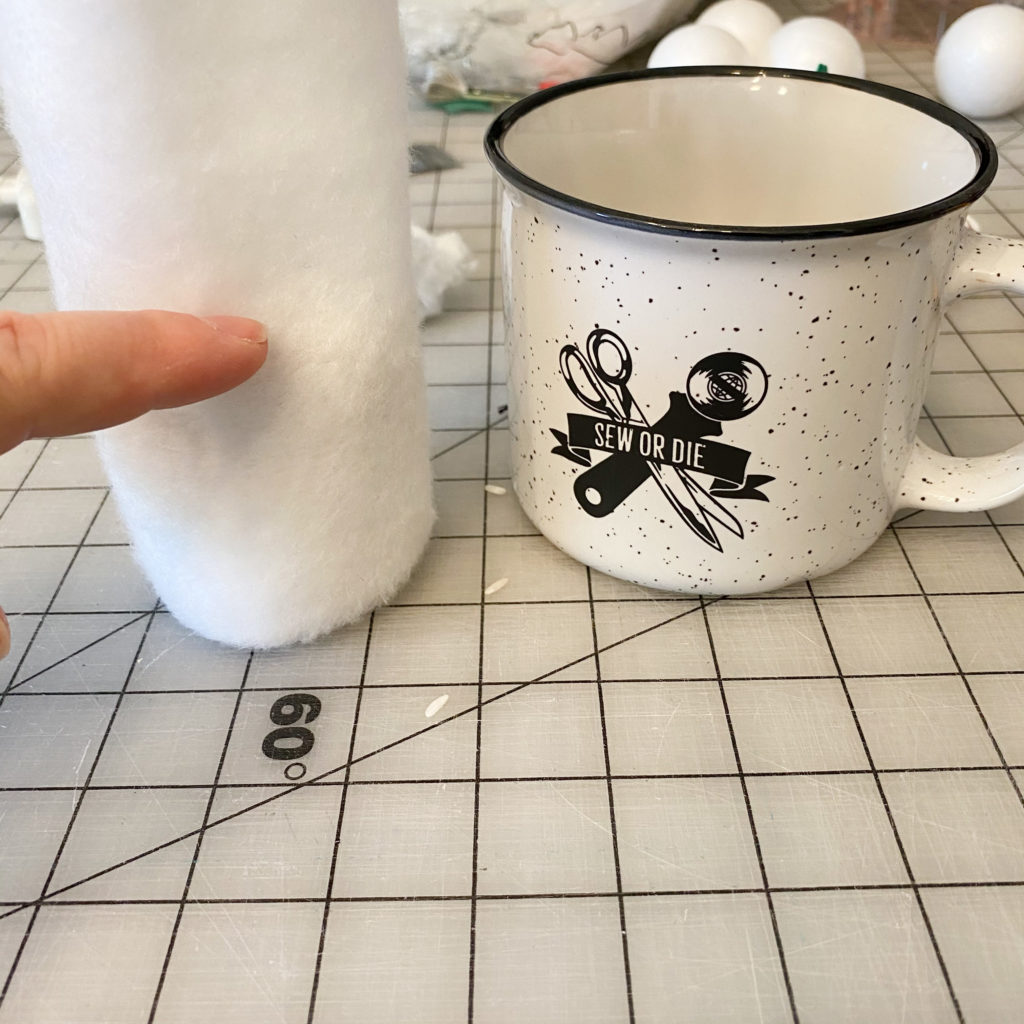
Sew the body rectangle in half the skinny way so you get a tall (or short) tube. Remember if your fabric has a right and wrong side to sew with the right sides together.
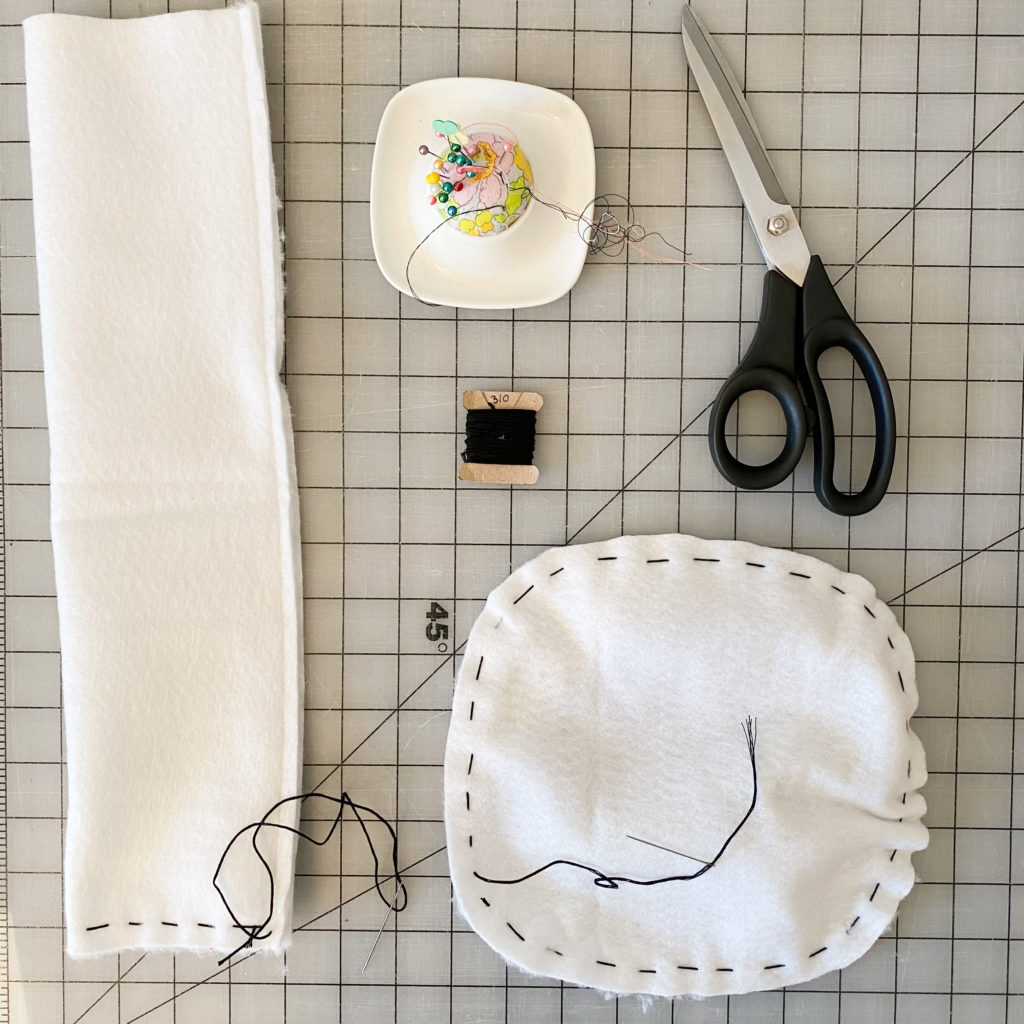
Now take matching (mine is black so you can see it) DMC floss or embroidery thread and do a large running stitch around the bottom of your tube, and around the outer edge of your circle. Stay at least 1/2″ in from the edges.
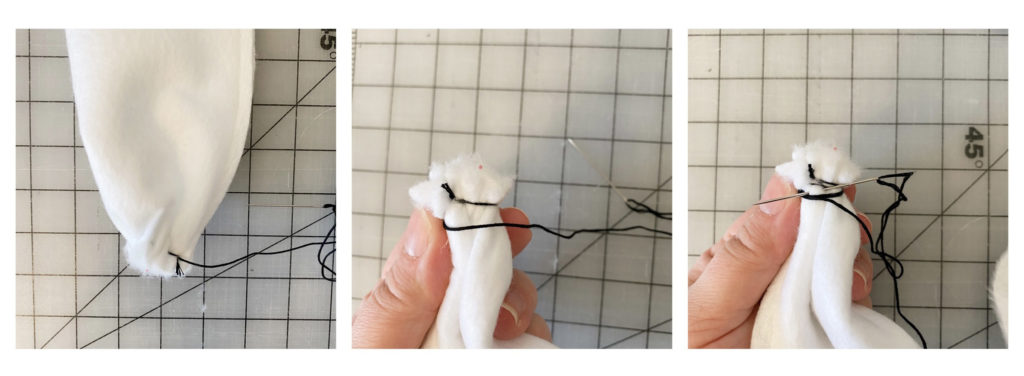
On the body tube, pull the floss to gather the bottom of the body nice and tight. Then wrap the floss around the body a couple times to hold it and then knot it in place and trim the floss.
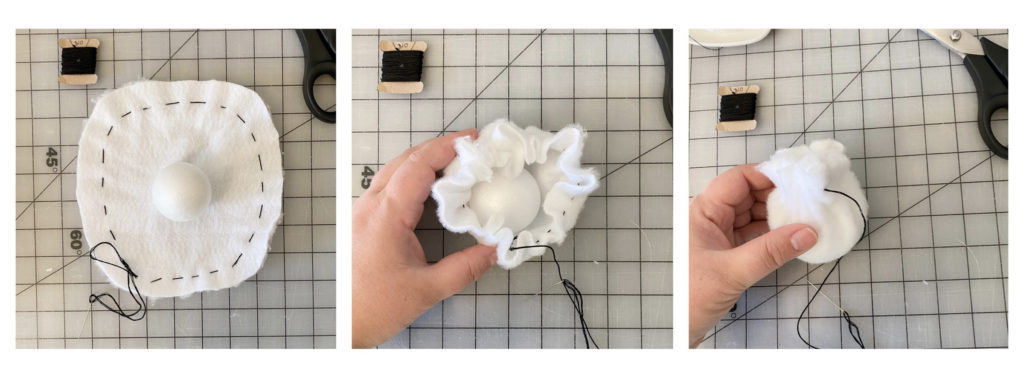
Next do the same thing for the head fabric. First set the Styrofoam ball in the center and pull the floss to gather the fabric tight around the head. Smooth and hold fabric in place with your hand as you tighten. thick fabric tends to have more folds, but you can usually smooth those down toward the “neck” area so the top of the head appears smooth.
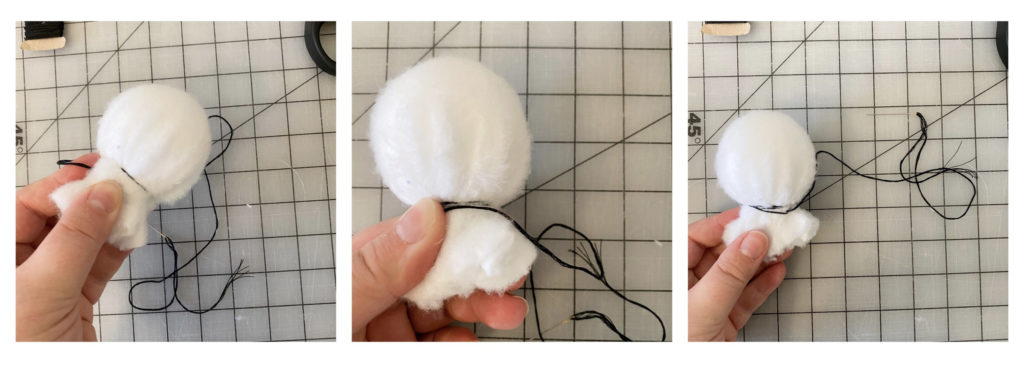
The same as body tube: wrap the floss around the base of the head a couple times pulling it as tight as you can get it, being careful not to break the thread. Knot and trim the floss.
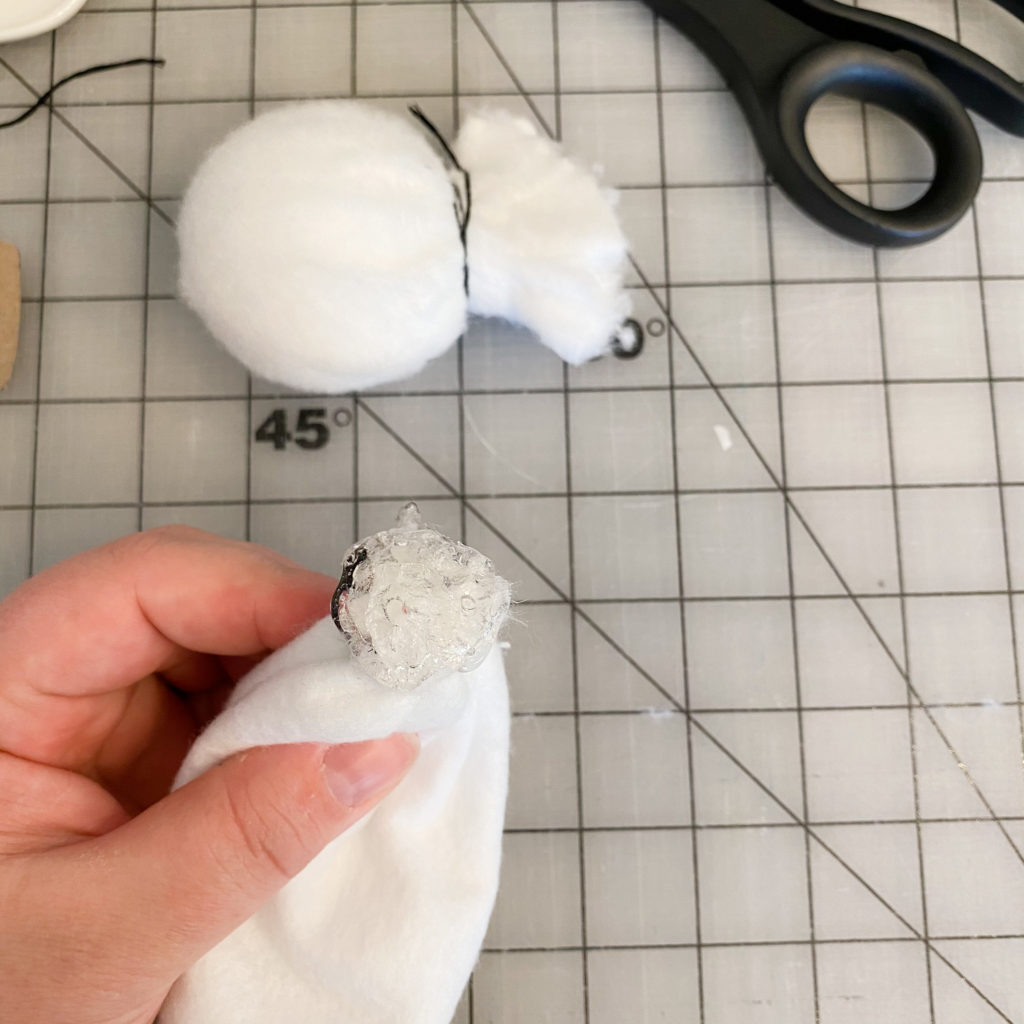
This next step is not necessary but I like to do it for extra assurance.
Hot glue all over the bottom of the body tube where it’s all gathered. Only on the very bottom, it doesn’t not reach to even the stitches. This step is to seal that hole so that none of the rice can wiggle through once it’s stuff. Let the glue fully dry.
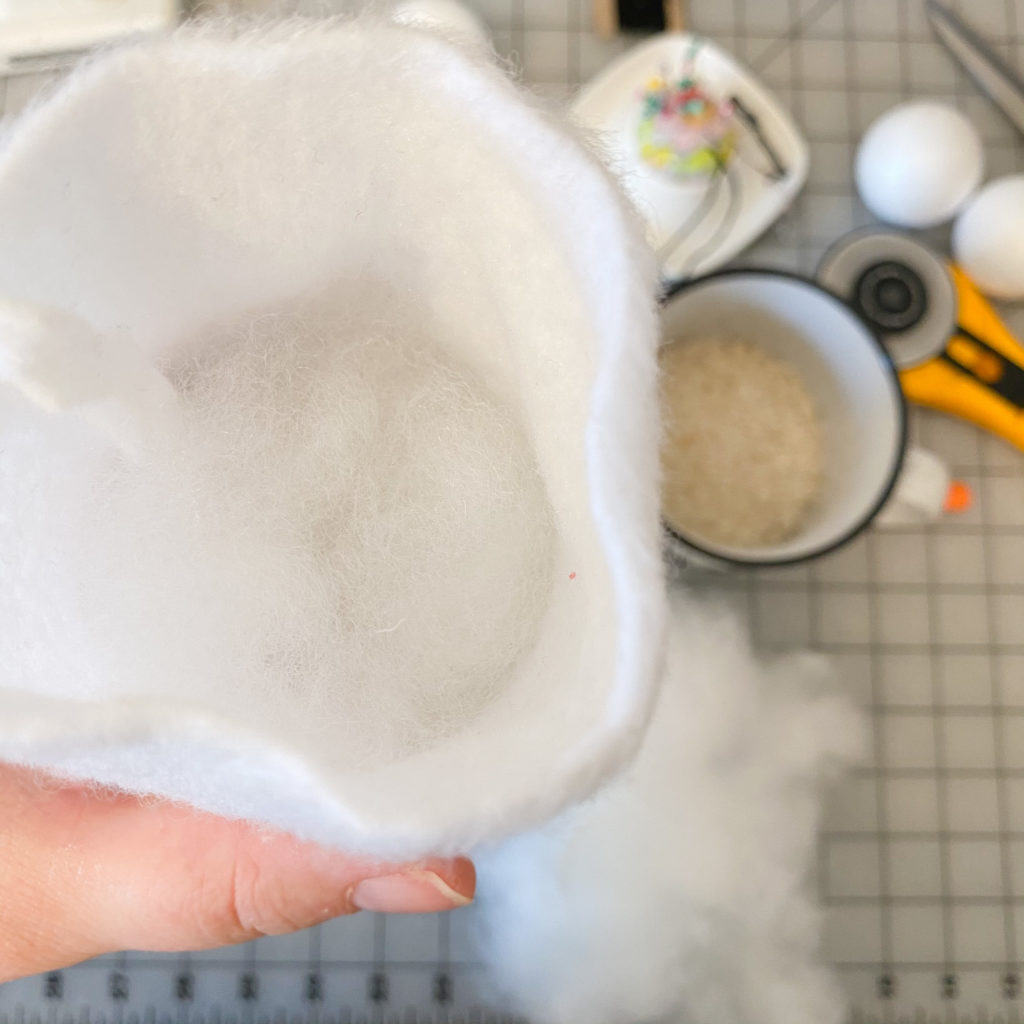
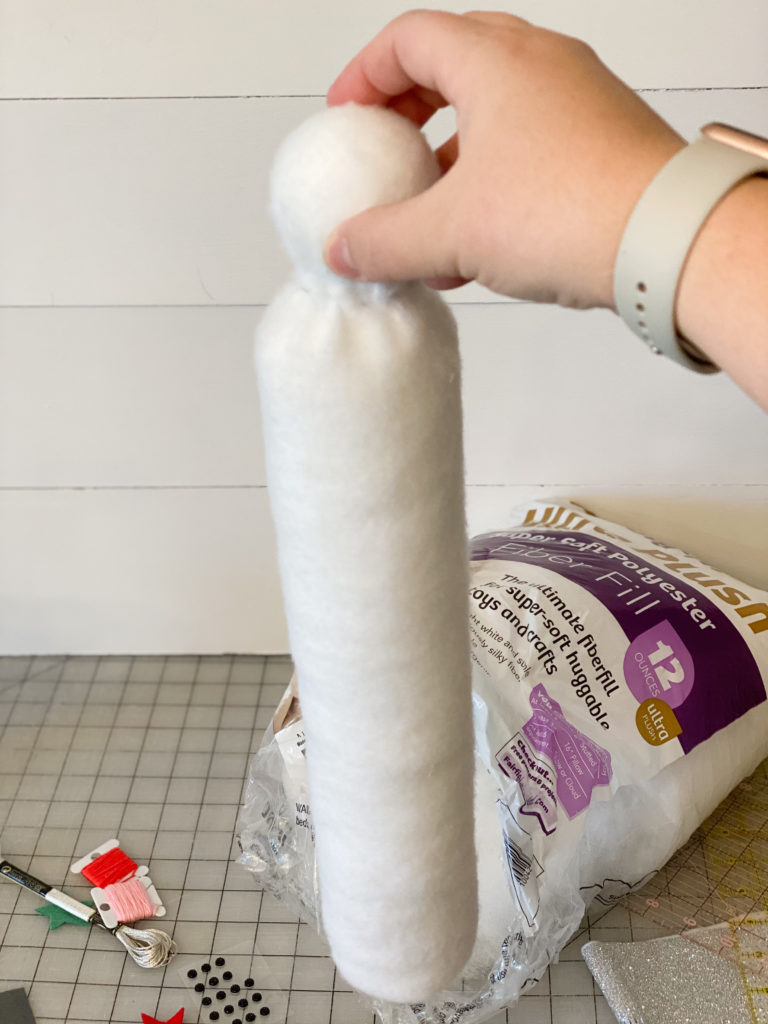
Now turn the body right sides out by stuffing the glued bottom portion into the tube and pull it all right sides out.
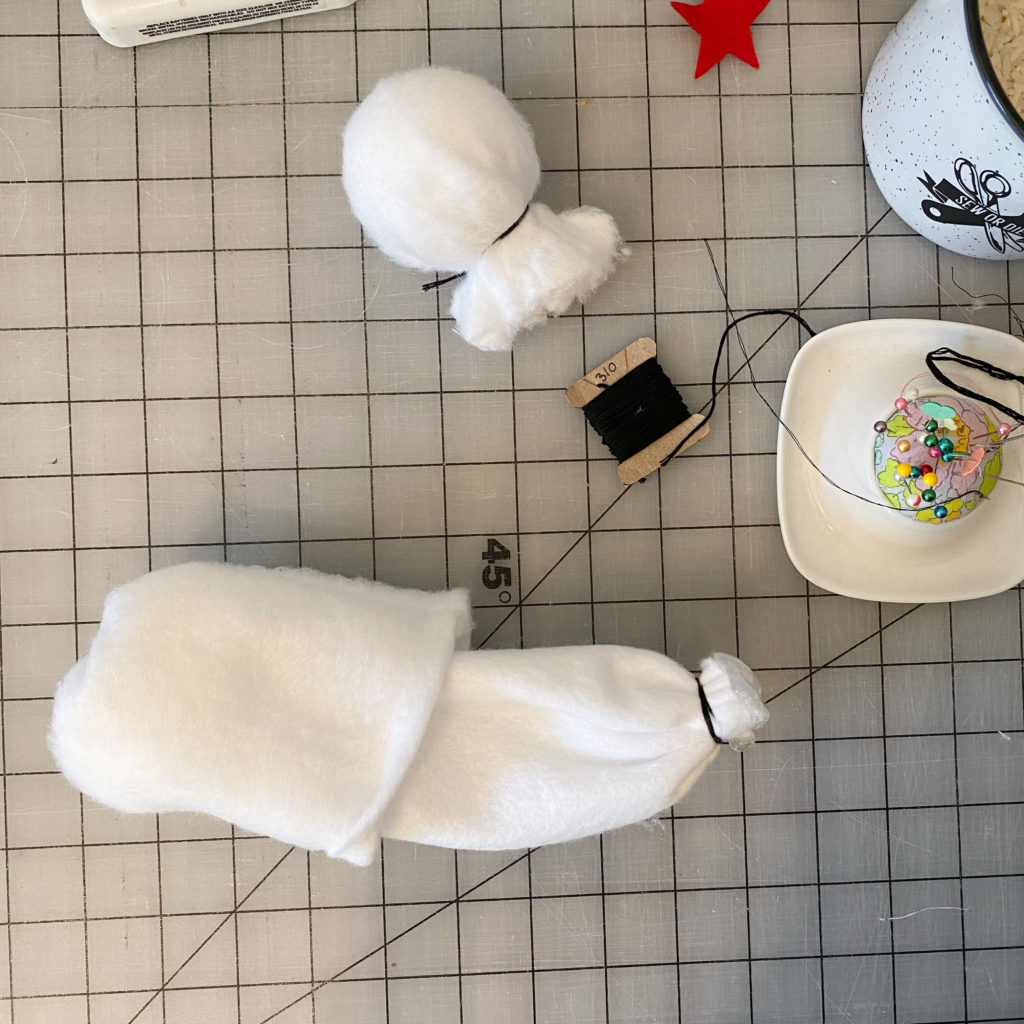
This is what it should look like at this point.
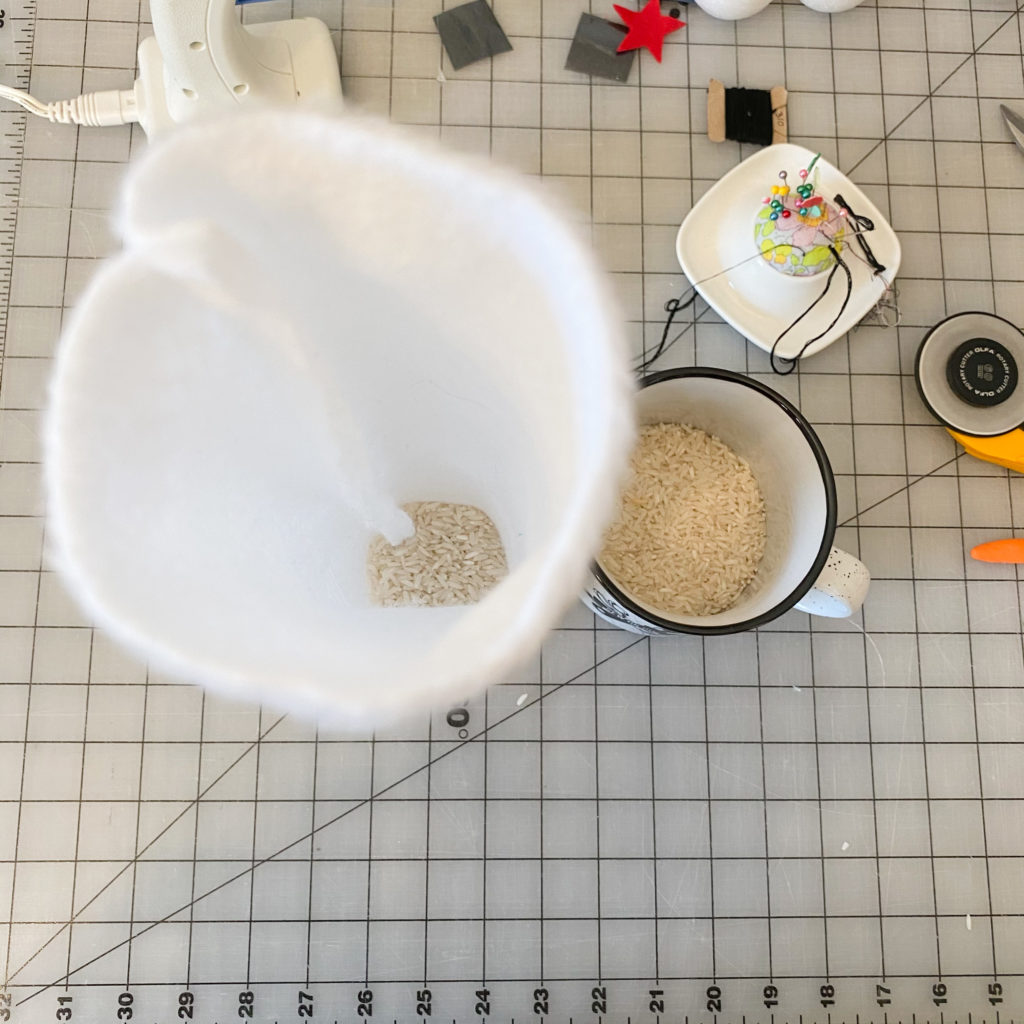
Now you are going to kind of set up your tube with the glued bottom sitting flat on the table surface (but it’s inside the body tube) and you are going to fill the bottom 2″-3″ with rice.
Your main concern when filling with rice should be that it is pretty straight. Keeping the rice level and making sure the rest of the body is even and goes straight up. What I have found is, the more rice the sturdier and easier it is to stand up. But if you are mailing them keep in mind rice adds weight.
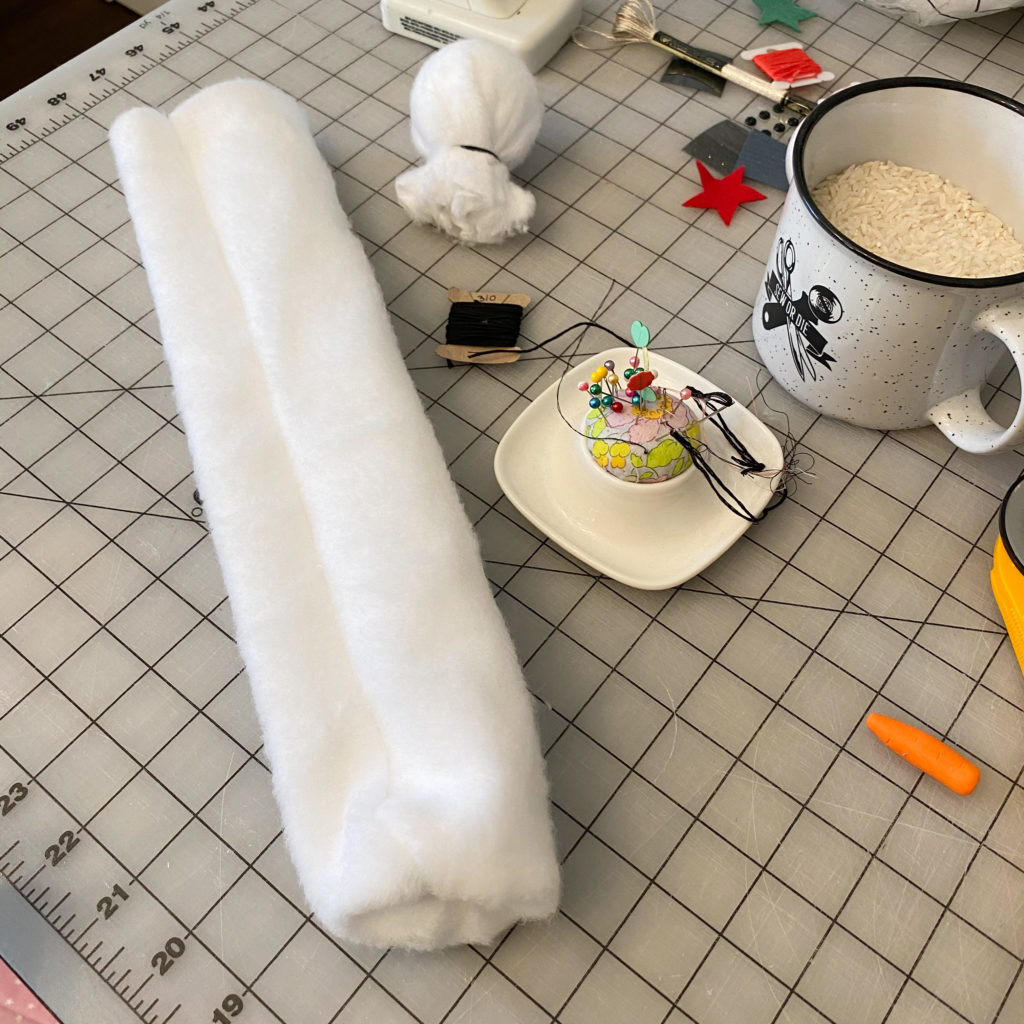
Stuff the rest of the body full of poly fiber fill.. or whatever fill you desire. Just keep in mind since they are white snowmen, depending on fabric thickness, other colors of fill can show through. Stuff to about 1/2″-1” from the top. Leave enough room to insert the gathered neck on the head piece.
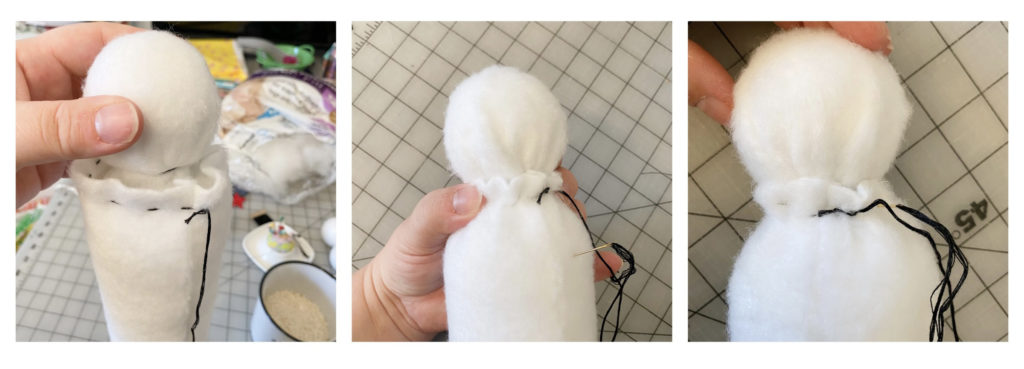
Do a running stitch using floss around the top of the stuffed body tube, roughly 1/4″- 1/2″ down from the top edge. Once you have the running stitch going all the way around. Take the head and insert it down in the body so the stitches on the neck align with the stitches just made on the body. Pull the floss to tighten and gather the body around the neck gathers. Pull as tight as possible and knot. After the floss in knotted, DO NOT CUT, take your needle and stitch through the body gathers through the head/neck gathers. Going around the head catching both the body layer and head/neck layers all around. Or crisscross through the whole neck section. Basically you are sewing the body to the neck. You just want to make sure it is secured tightly. You should be able to pick up your snowman by the head and have him stay intact.
Okay now on to the personality and embellishments.
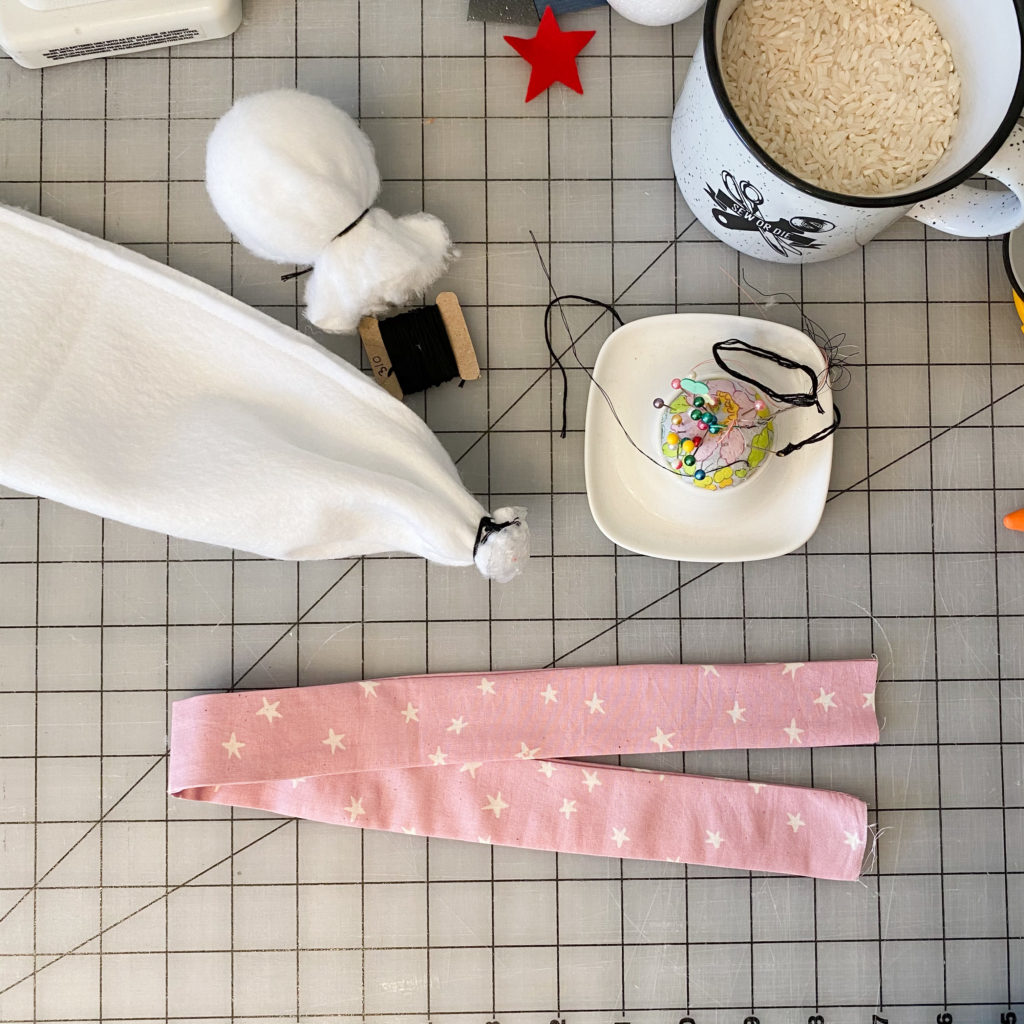
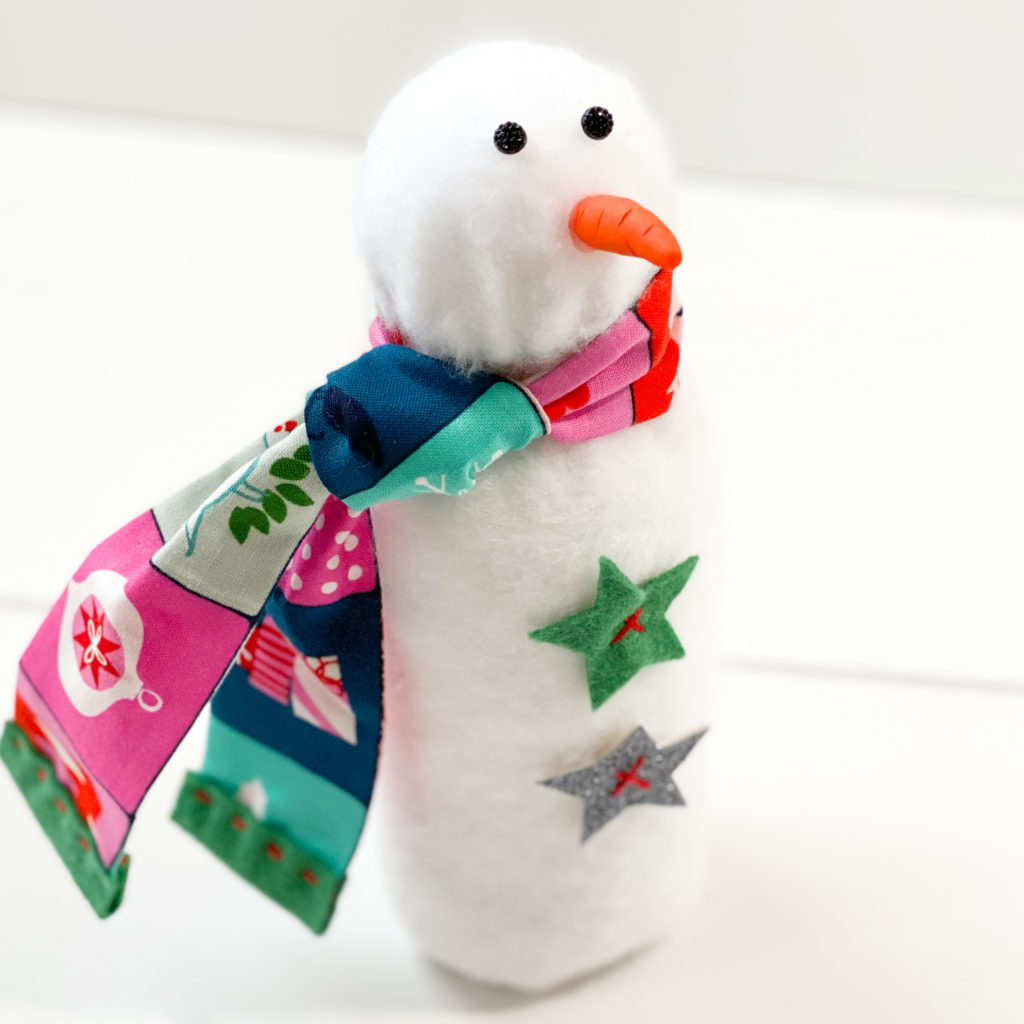
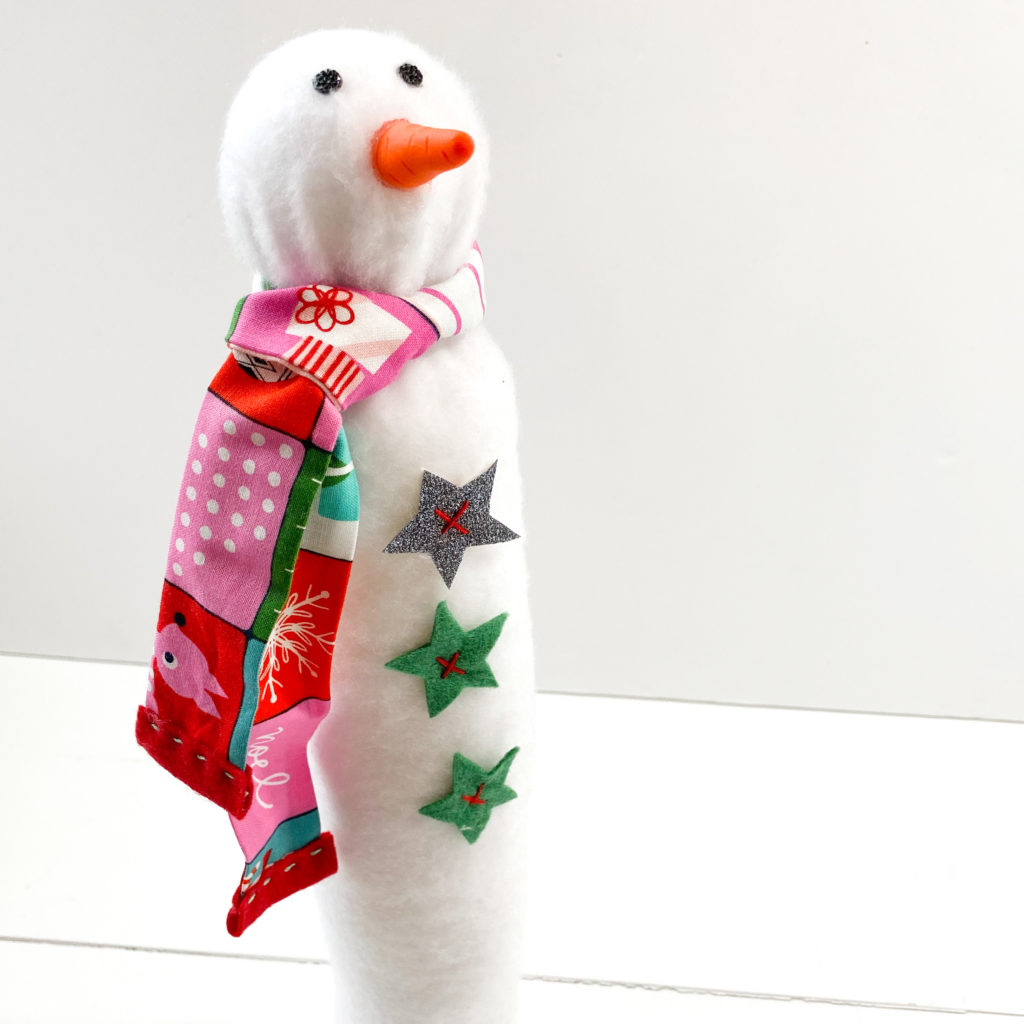
For a fabric scarf cut two 2″ x 20″ pieces and sew down just the long sides leaving the tiny ends open. Turn and press flat. If desired, wrap a little piece of felt and stitch it on the ends to “finish” the ends.
OR make or use any type of scarf. Remember the scarf covers the neck where the head is stitched to the body so you need a bit of thickness to the scarf to cover that part.
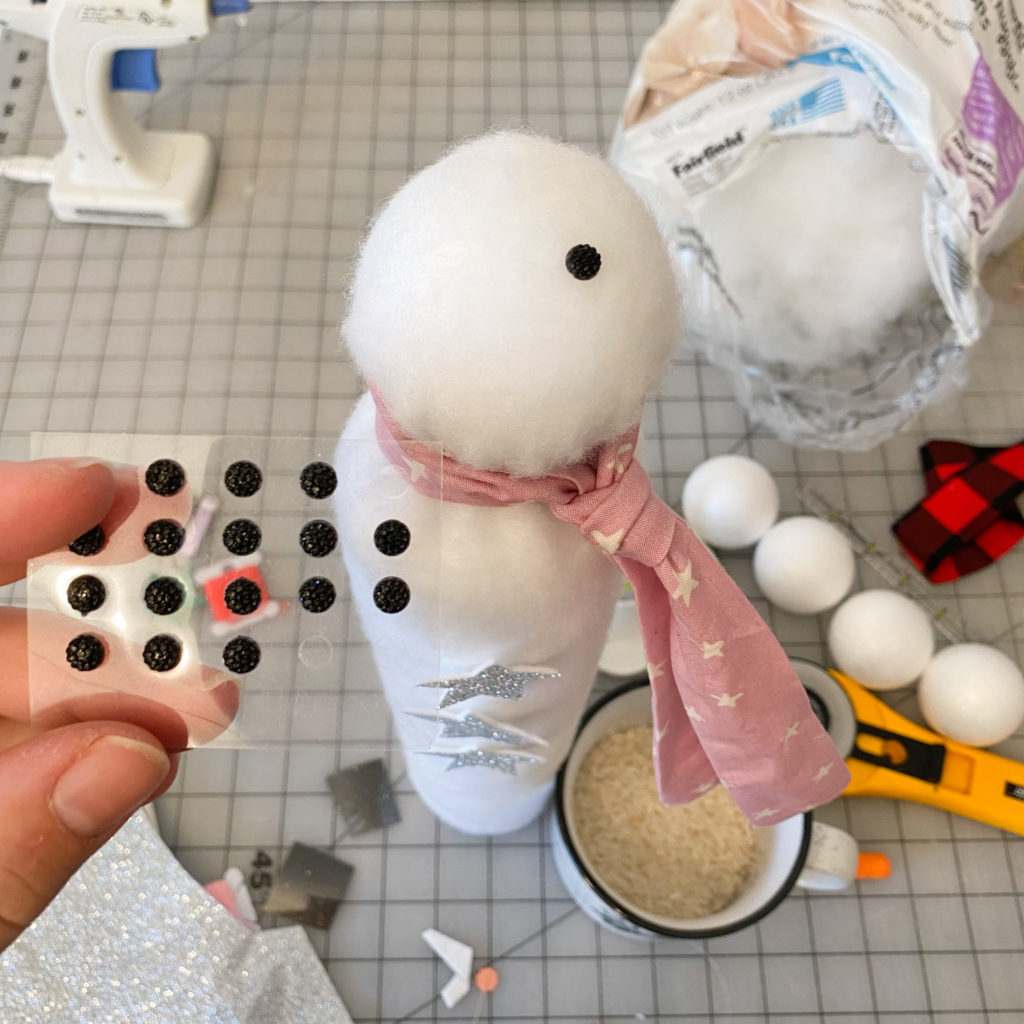
For the eyes, I like to place them a little more towards the top so they are looking up. But this is more personal preference. Just remember you do have a seam down the back of the body so try and place the eyes facing the side without a seam. I like to tie the scarf on first to get an idea for eye placement.
These are the jeweled stickers in the picture above that I have been using. I can’t say 100% but I am pretty sure I found them at Joann Fabrics.
In years past I have used a fat sharpie. LOL. To make a 1/8″-1/4″ dot. Or Black paint, using the end of paint brush to dab a perfect circle. I recommend practicing first for these options since they are permanent. I have also use round black beads, gluing as well as sewing them on.
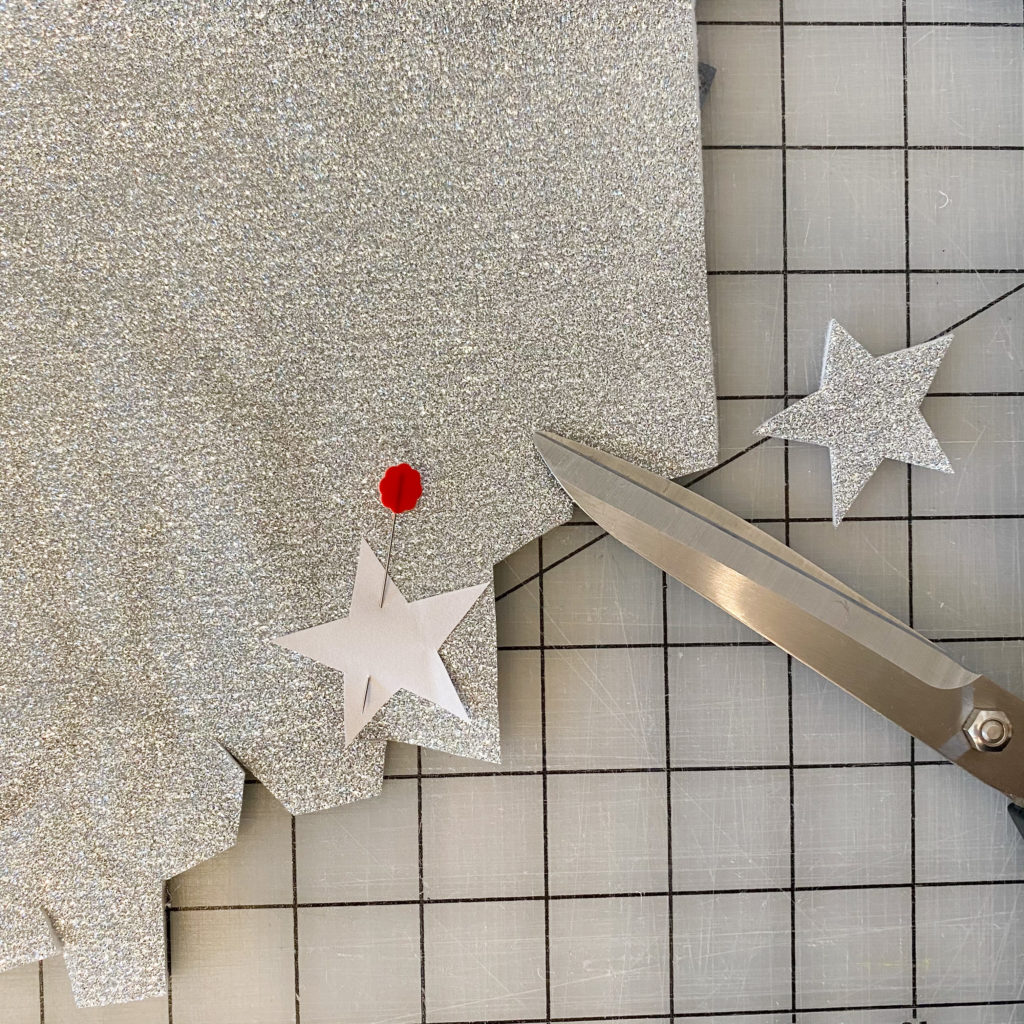
If you want to make felt or sparkle stars you can use the Star PDF Download or wing it cutting your own.
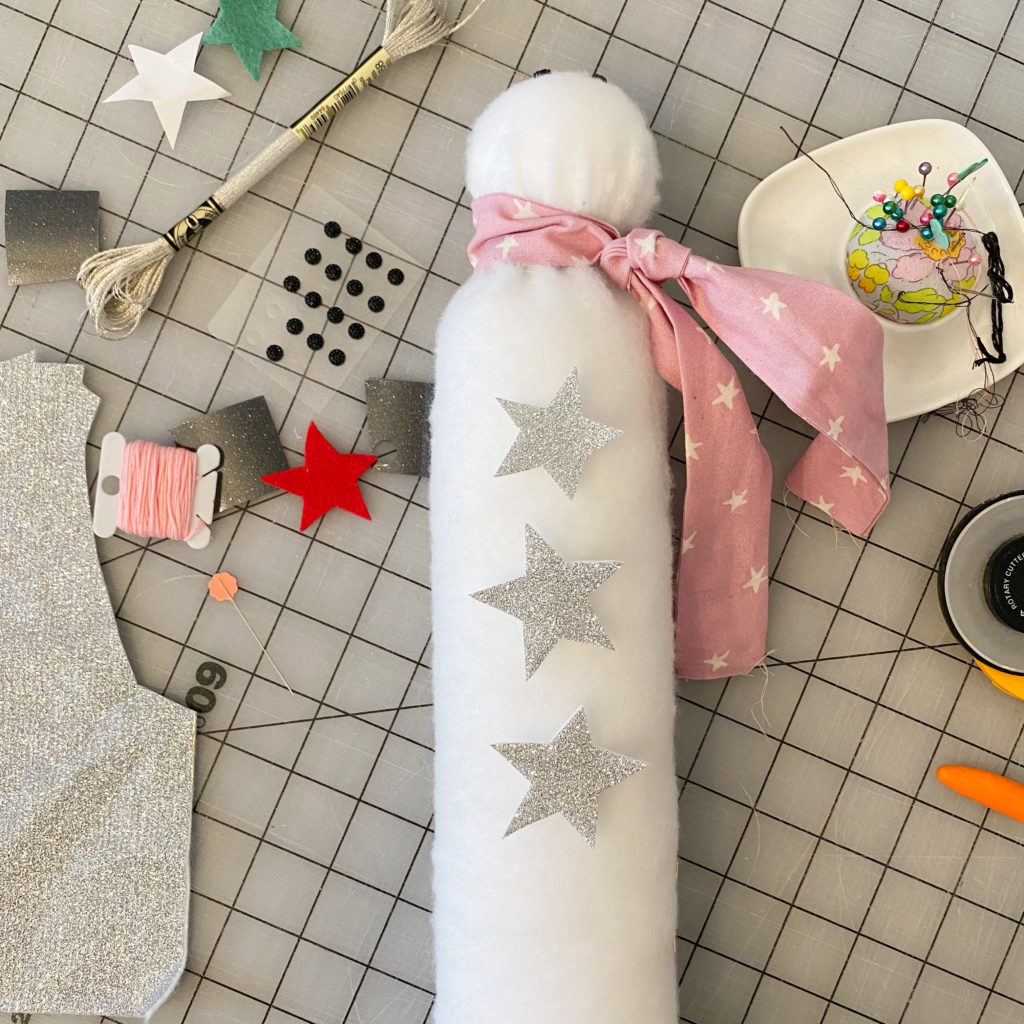
Position your stars or other button embellishments along the body after the eyes are placed. You need the eyes first to know where the front is. I start my first star/button about 1.5″ down from the neck.
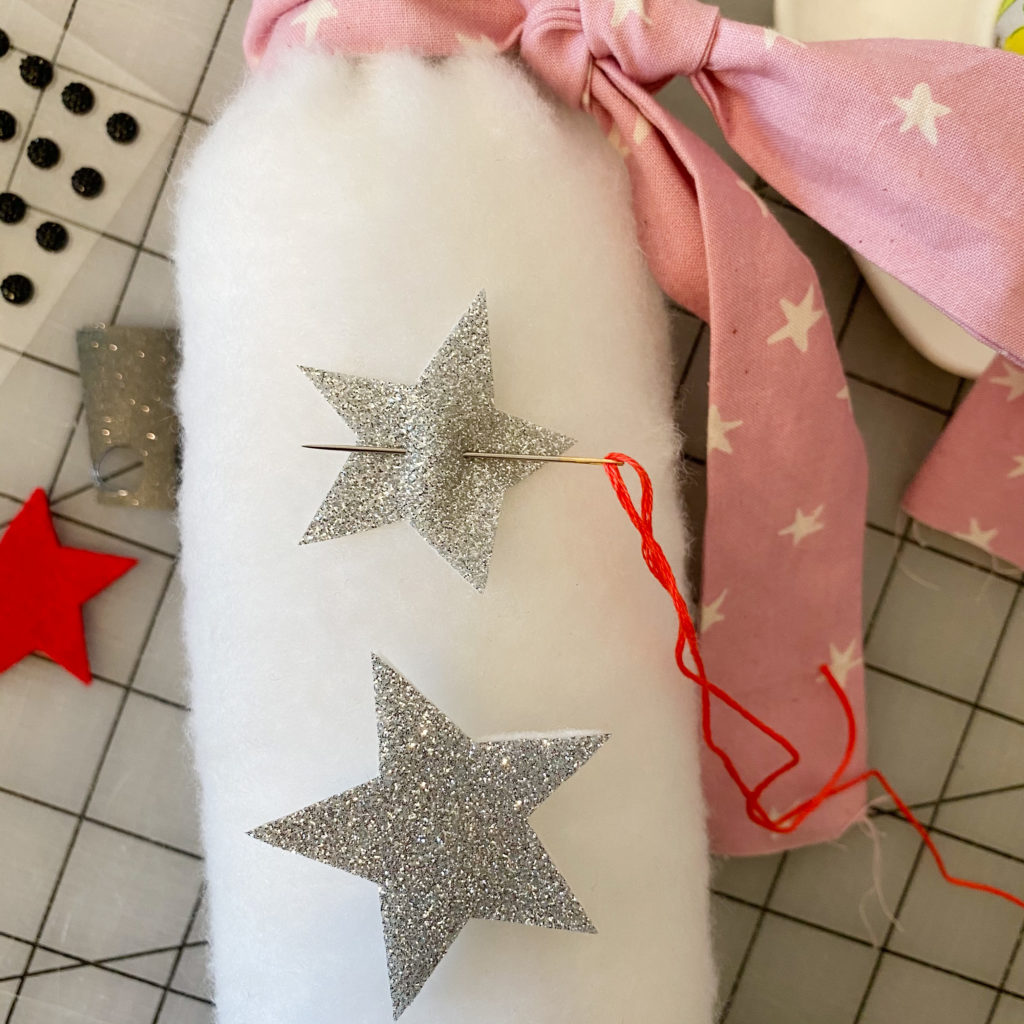
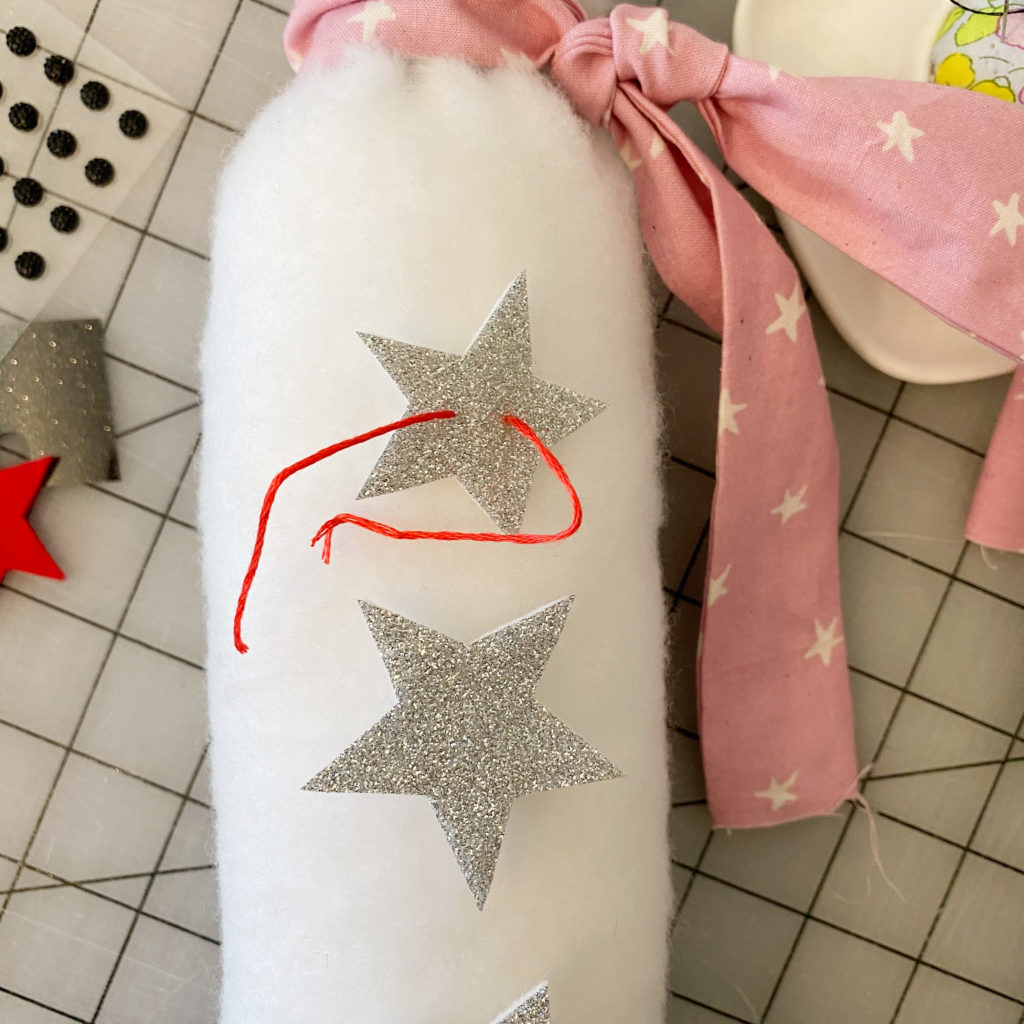
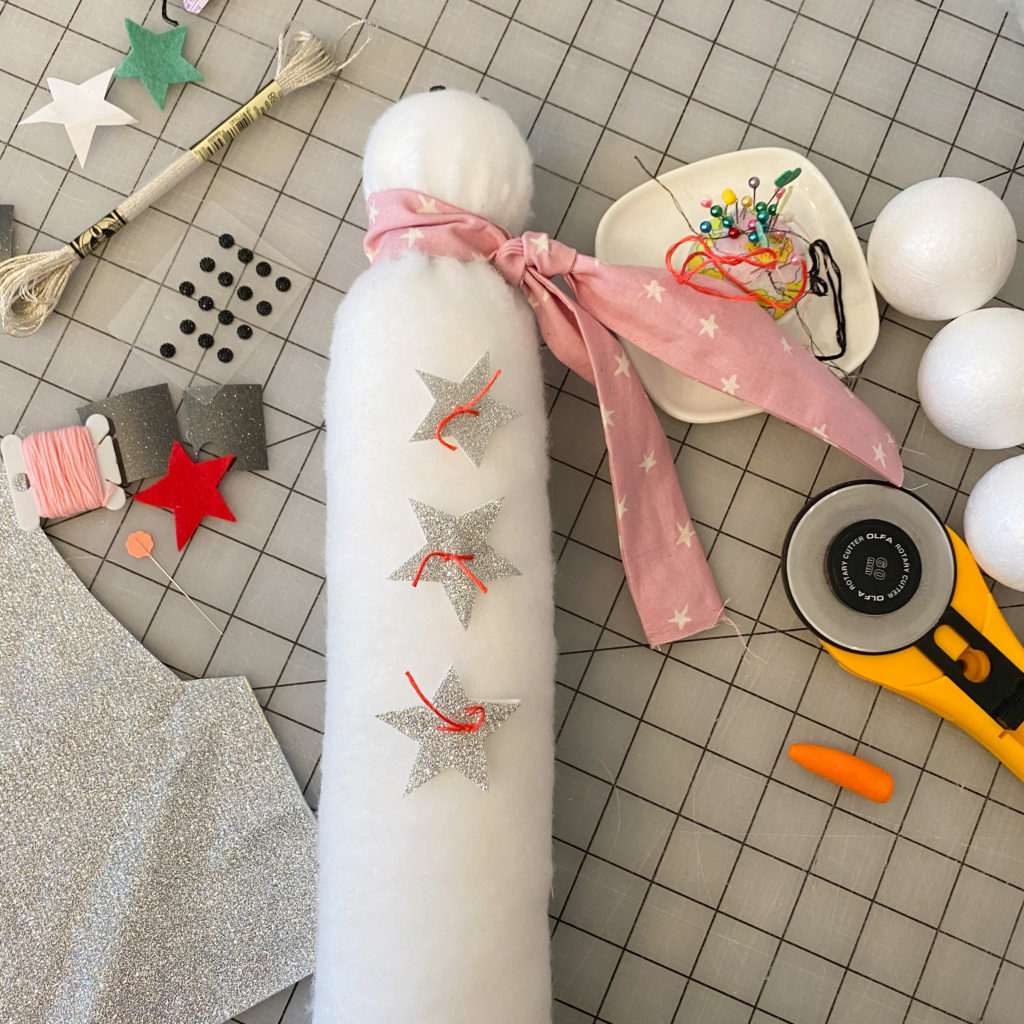
To sew the stars on, using DMC Floss, run the thread through both the star and the body with a needle and then knot it in place.
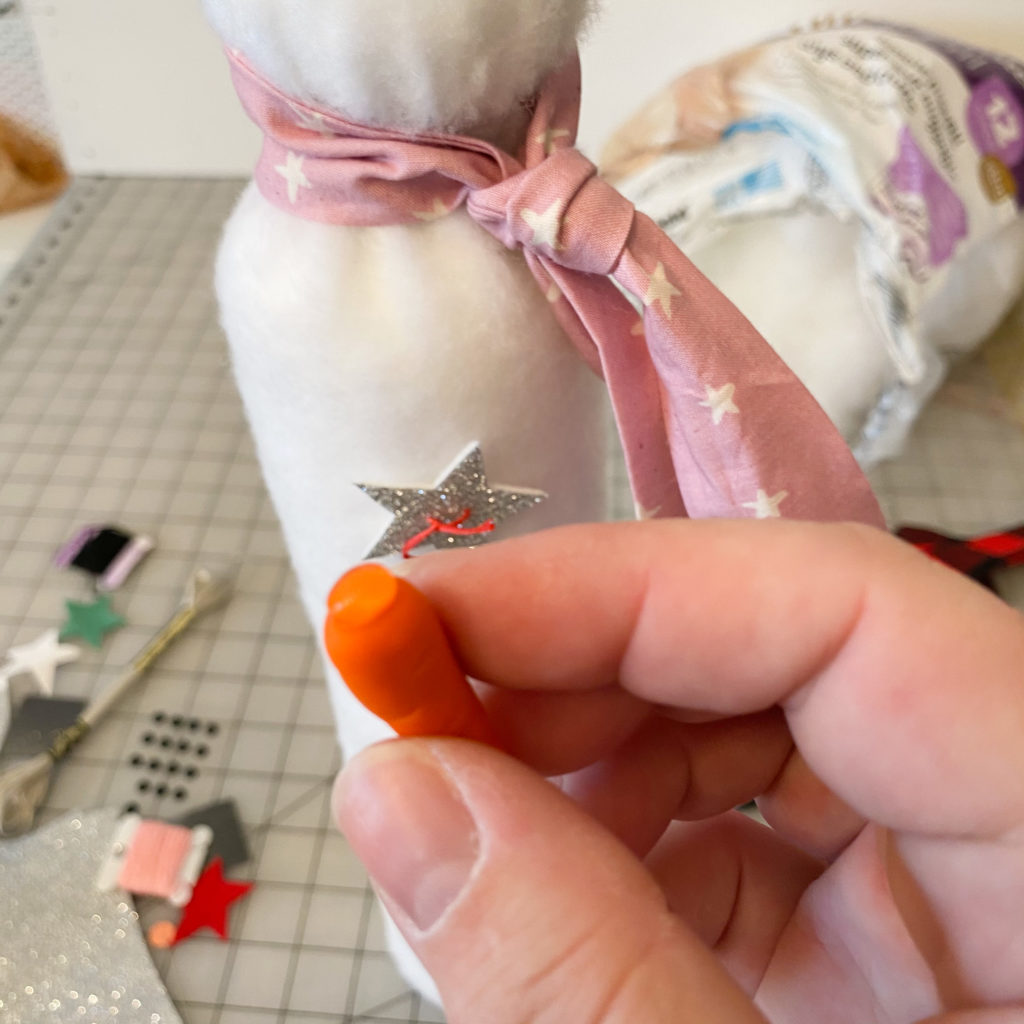
Lastly glue on the nose. If you have used the toothpick trick you would still use glue as well, just gluing around the toothpick on the base. Dab hot glue all over the blunt end and place it on the head pushing into the foam a little and holding in place until it’s dried. I like to have my nose pointing upward so it’s looks like the snowman is looking up at the snow falling. But that’s just personal preference.
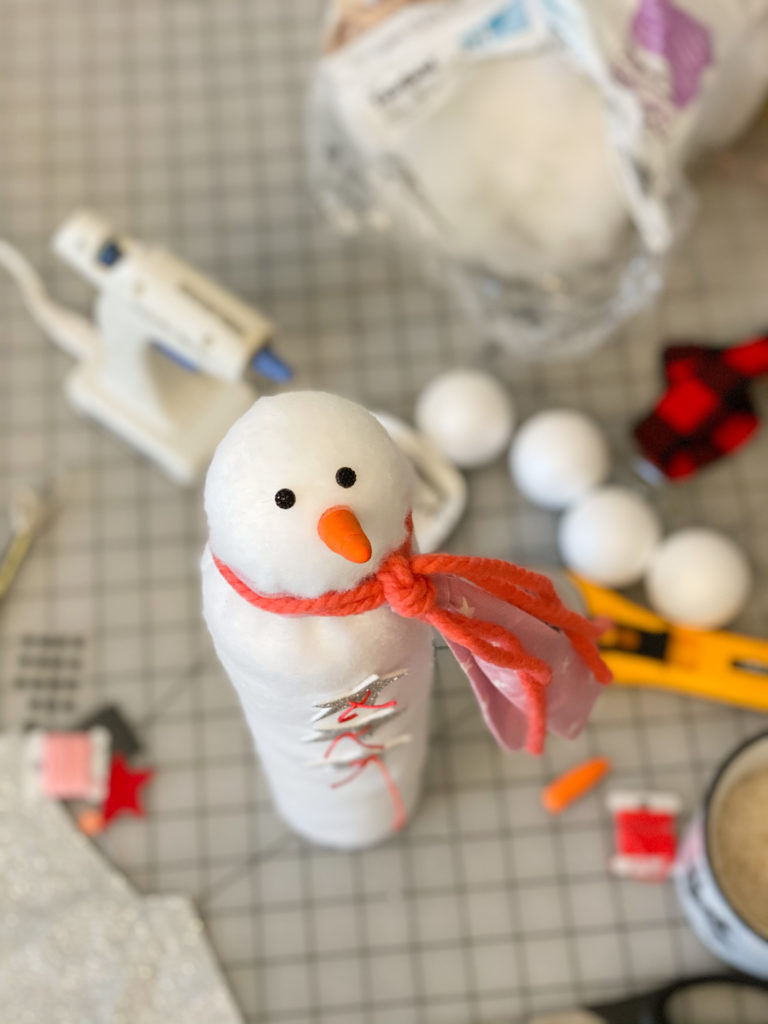
You can add fun little embellishments now, an extra layer to the scarf, dap a little modge podge glue here and there and sprinkle with clear or white glitter to look like snow when it dries. Sew or glue little jewels on and even a hat can add a little something special.
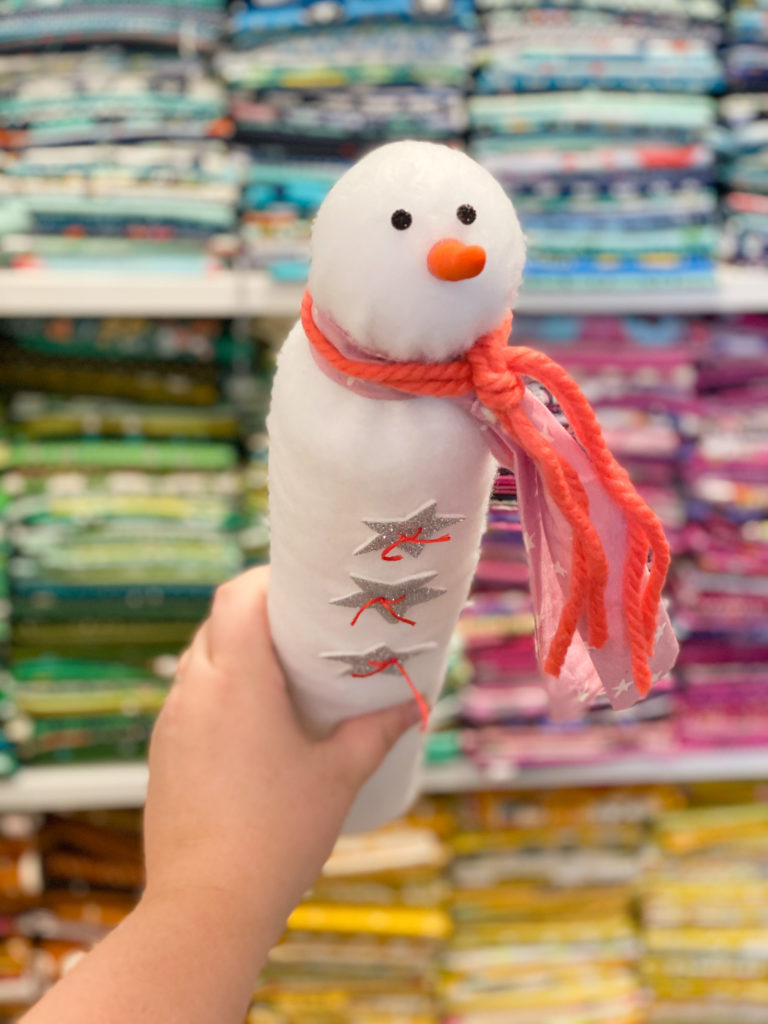
I also highly recommend a whole bunch of snowmen. :)

I am really excited to share this tutorial with you to make your own snowman. Please, please, please share with me via this blog, email, or Instragram. Tag me on Instragram and hashtag your snowmen #woollypetalssnowman so we can see all the fun creations.
I am fine if you sell things in a small handmade capacity made with this tutorial. I learned this method years ago from my mom, and I wanted to share the way I make them now. I know nothing is new under the sun and try to hold that mentality, giving credit where credit is due. So let’s all just be kind and spread the love and community by building each other up, being creative, sharing, and encouraging each other while we craft and make together.
Please email me woollypetals @ gmail.com no spaces. If you are interested in featuring this tutorial.
Thanks for stopping by!
3 thoughts on “Tall Snowman Tutorial”